It is a challenge to record the internet. Many people think it can only be done with software like Web Ripper, however that kind of software makes the file sizes of your mp3's very large which will use up too much bandwidth on your server and won't work for podcasting at all. WebRipper works by extracting websites as they are being downloaded onto your computer and then recording them as they are on your computer's hard drive so how would you get audio from the internet into it? It's not going to happen.
With lockdowns and home quarantine, everything we do nowadays is online. From ordering groceries to paying bills, we have become more reliant on digital technology. One of the best things about it is that there are now more resources that we can find on the internet. You can even watch videos on YouTube, Metacafe, or Dailymotion.
If you’re planning to watch them offline, you either have to get a subscription. In broadcast webinars and live streams, however, you won’t be able to do so unless the administrator lets you.
Whether you’re using a phone or a desktop, we compiled 4 ways to record from the internet.
Desktop
1: Screencastify
Rewatching live streams, webinars, and online meetings can be difficult sometimes. To deal with this, you can add Screencastify.
Screencastify is a Google Chrome extension. All you have to do is download the extension from their website or the Chrome store.
Steps:
- Go to Screencastify’s official website and download their extension.
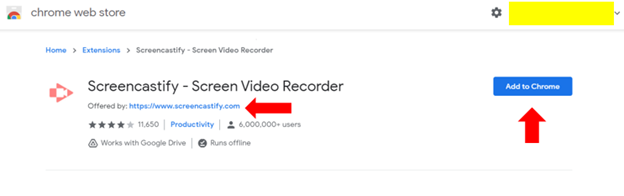
- Click “Add to Chrome”.
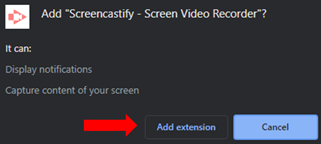
- Next, click on “Add extension”.
- Wait for a few seconds. Then you should be able to find Screencastify’s icon near the URL. You’ll need to sign in to your Google account to use it in your browser.
- Play a live stream video that you would like to record. On your upper right, click on Screencastify’s extension. Press the record button to start.
- When you’re done, all you need to do is select “Stop sharing”. It can be found at the bottom of your screen.
- You’ll be prompted to a new window where you can download it. All the videos will be automatically saved to Google Drive.
2: VLC Media Player
Apart from being able to play your music and videos, VLC has screen capturing tools that are often under looked. However, it can only capture the video and not the audio. You will have to open the recorder at the same time and edit it into the recorded video.
Steps:
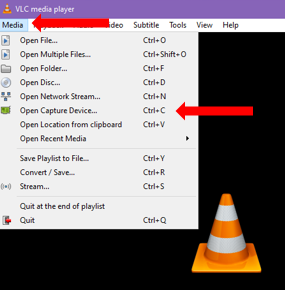
- Open VLC
- Select Open Capture Device
- From the “Capture Mode” menu, choose “Desktop”.
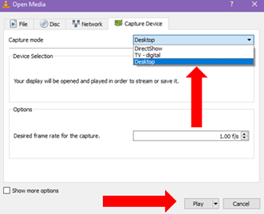
- You can adjust the frame rate before you move to the next step.
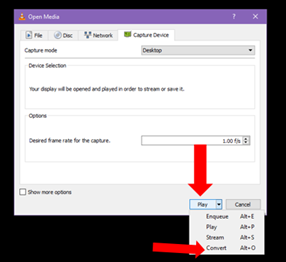
- At the bottom of the screen, select the arrow button located next to the “Play” button.
- Choose “Convert”.
- There should be a pop-up. Next, you need to change the video output format by going to “Profile”.
- You can also select the file’s destination on the hard drive.
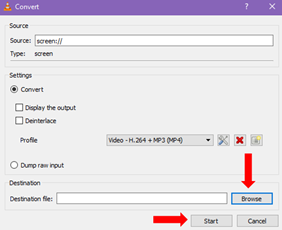
- Press Start.
- Once you’re finished, press Stop. You can also choose Pause if there are parts you don’t want to record.
Mobile Device
1: iOS
Go Record
If you’re using your phone, Go Record lets you record your phone’s screen. If you want to capture a video or a meeting, you only need to download the app. Although it’s mainly used for streaming, you can also use it to rewatch webinars. Just make sure your audio is not on silent mode.
2. Android
AZ Screen Recorder
Just like Go Record, AZ Screen Recorder allows you to take a video of your phone’s screen in HD. It has a free version and a pro version. It has more features that let you tweak your recording.
You only need to download it from the Play Store. Older versions of Android might not be compatible with it.
Summary: Record from the internet
- Set up your recording equipment.
- Choose a recording device.
- Run the audio cable between the computer and the recorder. Plug one end of the cable into the headphone jack on your computer and the other into the microphone port (or, if you have one, line-in port) on your recorder.
- Set up an audio interface (if needed). If you are using a microphone-based setup to record sound, you will need an audio interface before you can record anything. An audio interface is an external device that provides both an input mechanism for your microphone and a way to transfer that signal to your computer.
- Check your level and make adjustments. Before recording from the internet, you should make sure that the levels on your system are set appropriately. Unacceptable levels can lead to poor quality recordings or worse, distorted audio.
- Start recording! Once you've checked your levels and set up everything properly, it's time to start recording from an internet source!.
Conclusion
Although almost everything can be found online, sometimes it’s hard to watch videos when there’s no internet connection. Luckily there are software and apps that can record it for you. You can finally rewatch live streams and webinars.
