Apple Mail is one of the email clients provided by Apple. It's a lightweight and simple email client, but it still has many useful features you'll never find in Google Inbox or Microsoft's Outlook. Using it is easy, and the program itself isn't that complicated despite its good looks, but you can still get stuck on some details. The aim of this guide is to show readers how to use Apple Mail properly and which settings they should change to make their work with the program easier and more convenient.
Apple Mail, as you might know, is the default mail app that needs to be configured on your Mac 10.0 and above. Using Apple’s Mail is quite easy, especially if you know what to do and how to do it.
Before jumping head on into the configuration procedures, make sure you have the following details with you:
- Your domain name
- Your email ID
- Your email password
Once you have all these details handy, you are all set to begin the journey from start to finish. Here’s what you should do:
First, open your version of Apple Mail. If this is the first time you have started using Apple Mail, you would need to add an account first. Additionally, if you are adding an extra, additional account, you can select “Add Account” from the Mail menu.
Steps to follow
After that, follow the steps below to add a new account into your Apple mailbox.
- In the Mail menu, click “Preferences”.
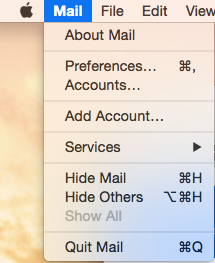
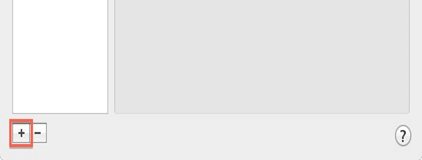
- Click Accounts; followed by “+” symbol, which is right at the bottom of this tab.
- Go to “Add Account” window; enter your account name, email address, followed by your email password.
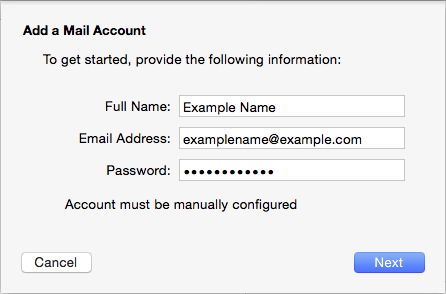
- Press Continue.
- On the next screen, which is the Incoming Mail Server screen, choose from either POP or IMAP in the Account Type List. You can use the following details:
• Description: Name of your account
• Incoming mail server:
o For POP: pop.secureserver.net
o For IMAP: imap.secureserver.net
• User Name: Your email address
• Password: Your email password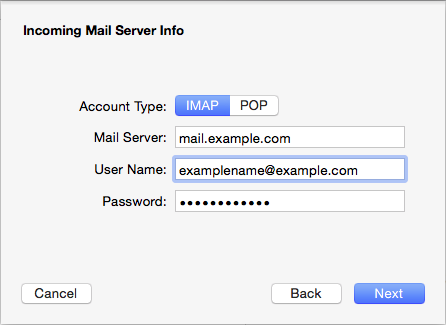
- Click Continue once done. It’s time to set the Outgoing Mail Server details now. Use the credentials as listed below:
• Description: Name of this mail server
• Outgoing mail server: smtpout.secureserver.net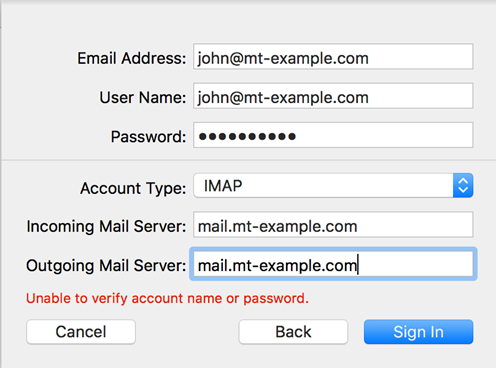
- Tick the “Use only this server” box.
- Tick the “Use Authentication box”. After that, proceed to input your User Name as well as Email Address again. Click Continue.
Enabling SSL Encryption
- Click on Mail menu followed by Settings.
- After that, click Accounts, followed by Server Settings.
- Click on Incoming email server or IMAP/Incoming email server or POP3 (depending on what you are using); you have to disable the option by clicking on “Manage connection settings automatically”.
- Enter the port numbers listed below, which correspond to the chosen server:
* For IMAP: Port number is 993 (To be entered in IMAP --> Port field)
* For POP3: Port number is 995 (To be entered in POP3 --> Port field) - For Outgoing Mail Server (SMTP), you need to disable option “Manage connection settings automatically”.
- Port Number is 587 for “Outgoing Mail Server (SMTP)” field.
- Click on Save.
Setting up default email mailboxes in Apple Mail
Apple Mail app offers a series of 6 mailboxes which includes:
- Inbox
- Advertising
- Sent
- Drafts
- Archive
- Trash
If you are using IMAP, you have the flexibility to access it from any device. In case you have a local mailbox, your access will be restricted to your local PC only. In order to manage the mailboxes, (this is for versions up to MAC OS El Capitan 10.11 only):
- Open Apple Mail App.
- Highlight Inbox.
- Select Mailbox, followed by New Mailbox. Create mailboxes for Advertising, Drafts, Sent, Trash and Archive.
- Select any of the newly created mailboxes.
- Select Mailbox ? “Use this Mailbox as” button to assign functions to each type of mailbox.
- Repeat the last step for all the newly created functional mailboxes.
For versions ranging from Mac OS Sierra 10.12 to the most current OS versions:
- Open Apple Mail App.
- Click Mail ? Settings --> Accounts tab --> Mailbox Behaviour.
- Select the required email account.
- Choose from the list boxes to set the required destination mailboxes.
By following these steps, you can successfully create and configure your email mailboxes on Apple Mail.
Summary: How to Use Apple Mail?
- Email has changed the way we communicate and exchange information. Although some people use only email for professional purposes, there are many other ways to use it.
- In this guide, you'll learn how to use Apple Mail and send your first message.
- To open Apple Mail, click the blue icon in the dock with a picture of a stamp on it.
- When you open Mail for the first time, it may ask you to enter some information about your email address. Enter your name as well as your email address and password and click "Continue."
- You’ll see an alert that asks if you want Mail to remember your password. This will save you from having to enter it every time you open Mail. Click OK if this is something you want.
- Now that you’re signed in, let’s send an email! Click on the new email button (or press ?N).
- On the right, you should see a blank email message with "To" at the top. Type in the email address of a friend or colleague here. On the left, write whatever you want in the body of the message under "Subject".