If you have reached this page of the article, you must have an interest in working with Apple Mail. Well, that’s great news! In today’s tutorial, we will be focusing on adding a signature to your Apple Mail account. However, it should be mentioned that there are different types of signatures available and it is crucial to choose the right one for your business needs so that you don’t end up spoiling the professional image of your company.
Adding an automated signature to email texts in your Apple Mail is as simple as it sounds. The complex task may be making a well-informed decision on the things you wish to include in your signature. Most email users will always keep off email messages that lack essential details such as salutations or a signature. Email owners will often log in to their emails to check on the latest updates and favorite motivational texts, especially if the email is linked to your venture.
Besides, login to a personal email address is a norm to someone who looks forward to accessing the daily quotes or inspirational messages which keep on popping up. To have the email message meaningful, you can choose to have the information keyed in from the beginning after an email message is created. However, this process can become simpler and time-saving by adding an automatic signature.
An automated signature added to the Apple email is also the best way to keep off errors that keeps on popping in. Such typos can be very disgusting to the users and can be disappointed because of the bad impressions they receive. This article comes in handy in offering simple steps to follow when affixing an Apple Mail signature.
Steps include
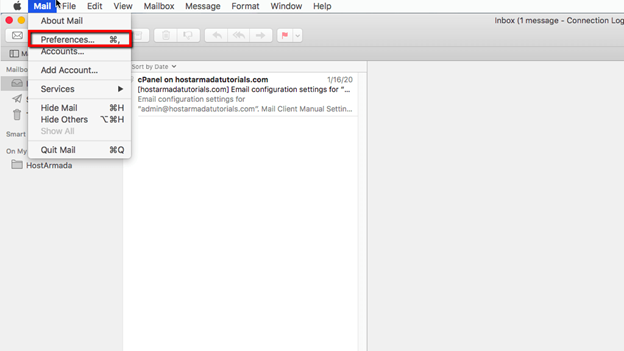
- Go to your Apple mail menu on the top-left side of your monitor, pick on Preferences options. Alternatively, use the Command-comma (,) available on your keyboard to have the signature created.
- Still in the Apple Mail preferences option, hit the Signatures button.
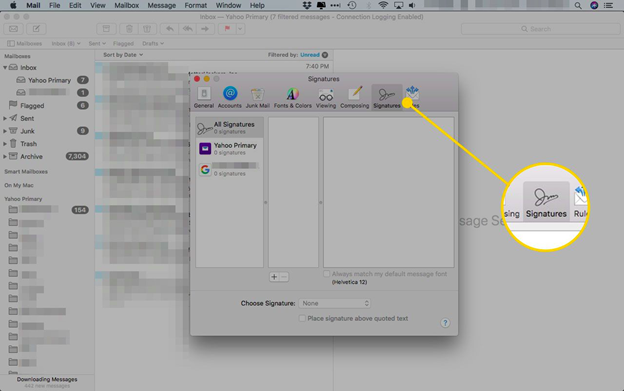
- In case you own two or more email accounts, choose the email for which you wish to add the signature.
- On the left-hand side, press on the addition sign (+) option that appears underneath the Signatures window.
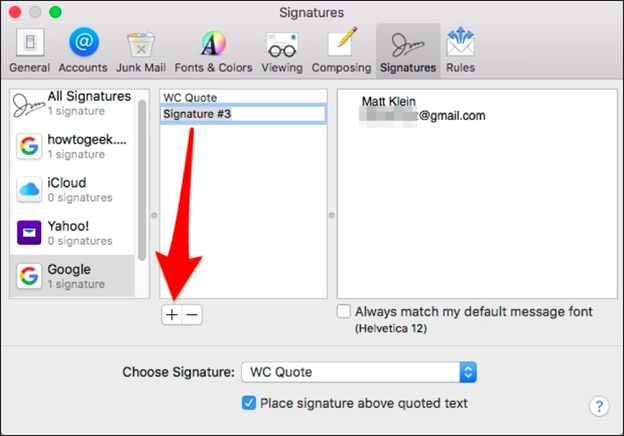
- Here, you will be required to describe your signature using your job, individual profile, business, or even pals. On the other hand, adding more than one signature will require you to come up with descriptive names for easier separation.
- The Apple Mail will come up with a default signature depending on the chosen email account. The default signatures can be replaced by one keying in new details.
- For users who want to have a link included, the principal part of the URL needs to be used instead of the whole URL where the mail changes it to a live link. Verify the validity of the link by paying attention to the typos.
- The URL is not needed; ensure the link's name is included by highlighting the link message, then hit on Edit, Add Link or use the Command-K on your keyboard.
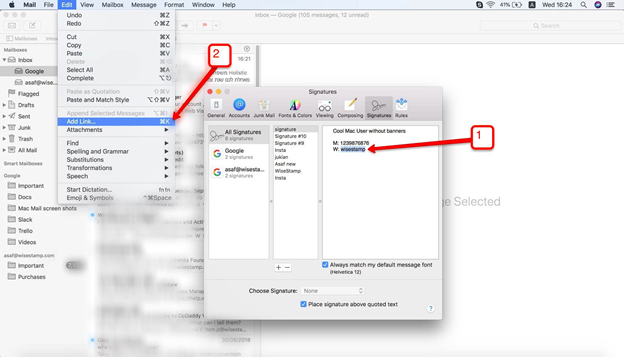
- On the drop arrow sheet, enter the URL and hit on the OK button.
- Adding images and fonts similar to the default font is done through a checkmark to match my default message font via the Signature window. Alternatively, you can use the Command-T on your keyboard for a different font on the signature message.
- On the other hand, a change on the color on your signature will need to highlight the text, pick on Show Colors from the Format menu option, and pick a slider in selecting the preferred color or a Command –Shift –C on the keyboard.
- For a mail reply, use a check mark so that the signature will appear above the quoted text.
- On the other hand, signatures will appear underneath with the recipient not visible if the user fails to quote the text.
- Upon satisfaction on the signature created, put off the window or replicate for additional signatures.
Summary: Add Signature in Apple Mail
- Open the Mail application.
- Click on 'Mail'. Click on 'Preferences'.
- Click on 'Signatures' tab.
- You can add a new signature by clicking on the plus sign (+) button on the bottom left of the window.
- Then, give your signature a name.
- After that, you can type your signature in the box.
- Once you finish writing your signature, click on 'OK' button to finish.
Conclusion
Keeping an eye on the above steps will help you have a proper signature reset on your Apple Mail. The procedure may be a long one, but the account becomes confidential and easy to use with patience.