In the following part of the article I'll show you how to forget a network on a Mac. We'll start with one of those questions that has no definitive answer: "How do I forget the network?". We can't say it any other way because forgetting an Air Drop or Personal Hotspot connection is not a simple procedure. However, it's not impossible either, as long as you have the right steps to follow.
When users start using a new device or a new system interface, they tend to save each setting they have inserted for future purposes. These saved settings become a burden when they are accumulated for a long time and the list becomes long so then when the users try to look for a particular setting for their work, they face problems finding the setting among the list of saved settings.
The Wi-fi network list is an example. As a device user, you need to add different Wi-fi networks to have access to the internet. These saved networks accumulate over time as you need to add new networks based on place and routers. You can always discard the saved settings of the Wi-fi networks on any device. Here, we will guide you on how to remove the networks from your Mac OS.
Removing saved Wi-fi networks from settings
Primary method
Almost every Mac user prefers this method as by following this, you will be able to remove multiple networks at a single command. The system will not ask you for confirmation for each network. Go through the procedure:
- Click on the “Apple” icon on the top-left section of Your Mac screen and select the second option “System Preferences” from the drop-down list.
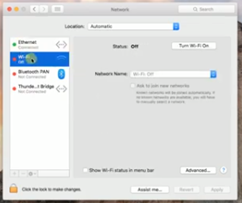
- A new window will be displayed showing you all the components in your system interface. Click on the “Network” labeled icon image to proceed.
- On the left side of the new Window, you will see a list of networks. They are the Ethernet network, Wi-fi network, Bluetooth network, etc. Select the “Wi-fi network” option.
- Remember that, if you are using your Mac system as an anonymous user, the user settings will be locked for you. If you want to make changes, you will need to provide credentials to get access to your account. If you go to the advanced settings without your user profile, you will not be able to delete any networks as the list will not be available for selection.
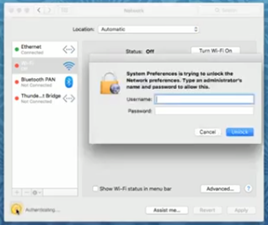
- After providing your username and password, click on the “Advanced” option.
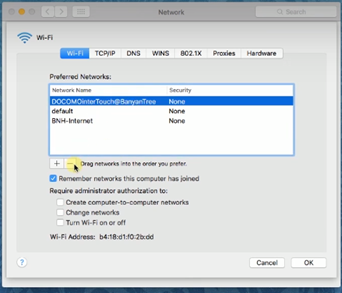
- Click to select the network which you want to delete and click on the “-” button below the list to remove the network. After removing all the networks, click on the “OK” option to exit the advanced settings. Click the “Apply” option on the general settings page to implement your changes.
Alternative method
The alternative method maybe a bit time-consuming as you have to confirm and delete every network individually. Nevertheless, this method is good and more accurate as you can be sure which network to delete even if you select a wrong one
- Click on the “Wi-Fi” icon on the top right of your Mac screen. A list of available Wi-fi networks will be visible to you. Scroll down to the bottom of the list and select the “Open Network Preferences” option.
- The network page will pop up. Click on the “Advanced” option to proceed.
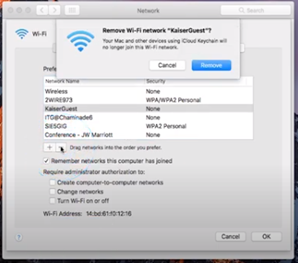
- Select the network that you want to delete from your Mac and press the “-” option. A pop-up will come forth asking for confirmation for the network removal. Click “Remove” to confirm.
- Delete the networks individually. After deleting all the networks, click on the “Ok” option to return to the network page and select “Apply” to make your changes.
Summary: Mac how to forget network?
- Click on the Apple icon in the top left of the screen.
- From the drop-down menu, select "System Preferences". This will open a new window.
- In System Preferences, click on Network and select either Wi-Fi or Ethernet under the "Network" column on the left-hand side, depending on your connection type.
- Wait for the network name to populate then click the "Advanced" button in the bottom right corner of the window. This will open another window.
- Select the Wi-Fi or Ethernet tab (again, depending on your connection type) and click on Advanced in a new bottom right corner of the window once more.
- The previous Wi-Fi Network or Ethernet Title window will change to a small list of available networks with a lock icon next to them (if they're secured).
- Click on any network you want to remove and select "Remove". The network will be removed from your system preferences, but not from your Macbook's hardware - this is just incase you ever connect to that particular wireless router again in future.
