Many windows 10 users who upgraded to windows 11 face many bugs and errors while operating the latest OS on their computer. One of these issues is that their network adapter keeps disconnecting on Windows 11 PC.
This problem is deeply investigated to find out the reasons behind it. It is concluded that many factors are responsible for network adapter disconnection on windows 11. These factors are; DNS inconsistency, corrupted network adapter, system file corruption, uncertain common network, and Inconsistent TCPIP and DHCP parameters.
Every problem has got a solution. When you find out what are the reasons behind the particular issue, you can also find out the specific way to fix it. We have already mentioned the factors involved in the random disconnection of Wi-Fi on Windows 11 computers. Now, we will discuss the particular solutions based on these factors to resolve the issue.
Turn on/off Airplane mode.
When you face this issue, again and again, try to fix it first by turning on the Airplane mode and then turning it off. The radio devices connected to your PC will be disabled and then enabled again by doing this. It may help to solve the problem of the frequent disconnection of the network adapter on windows 11.
Open Action Center by pressing the Win key + A.
Here, you can see the airplane mode. Click it to enable the airplane mode, and then after some time, click it again to disable it.
It will restart the radio devices like Wi-Fi or Bluetooth on your Windows 11 PC.
Now, check if the issue is resolved or not.
Restart the Router
Next, you can solve the problem by restarting the router connected to your PC. Restart it and believe me, this method helped many users solve various network issues they face on their windows 11 PC.
Check drivers
The connectivity issue may be caused by the network adapter drivers being corrupted or outdated. To update the drivers, connect to Ethernet and follow these steps.
- Press win key+R to open the Run dialogue box, write devmgmt.msc, and press enter. It will open the device manager. Alternatively, you can right-click on the windows icon and click on device management to open it.
- Expand the network adapter option and right-click on the network adapter. Click on update driver.
- In the pop-up window, choose search automatically for drivers. The driver will automatically be updated on your computer.
- Reboot your PC. It will solve the problem of network adapter disconnection.
Windows Internet Troubleshooter
Windows troubleshooter is another solution to your problem. It can help solve the frequent disconnection of the network adapter.
In the taskbar, right-click on the network icon. Select troubleshoot problems and complete the process. When done, reboot your PC, and you will see that the issue is resolved.
Reset the network adapter
Suppose the above methods are not working for you. Try to fix the problem by resetting the adapter.
- First, remove all the network adapters connected to your computer and reinstall them back.
- Press the win key + I to open settings and click Network and Internet Tab under settings.
- It will open the Network and Internet tab.
- Here, scroll down the right side section and locate Advance network settings. Click to open it.
- Move down to more settings and select the Network Reset option.
- Click on Reset now.
- Reboot your computer. Connect to the network adapter causing the connection problem and check if it helped fix this issue.
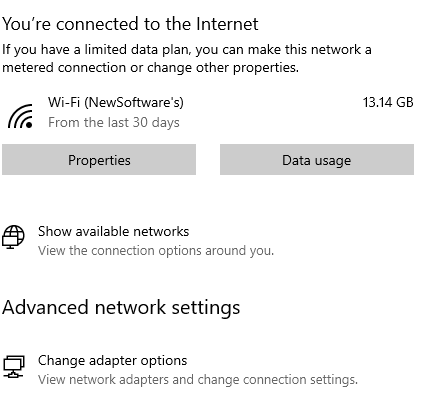
Check IP /DNS conflicts.
If the issue is related to the specific network adapter and other networks are working fine, the IP/DNS conflict may be the reason behind the issue.
- Click on the windows icon and click on settings to open it.
- Select the Network and Internet tab.
- Choose Change adapter options.
- Go to Wi-Fi network, right-click on it, and select properties.
- Locate internet protocol version 4, select it, and tap on properties in the list.
- Check that the IP address and DNS server address are set to automatic.
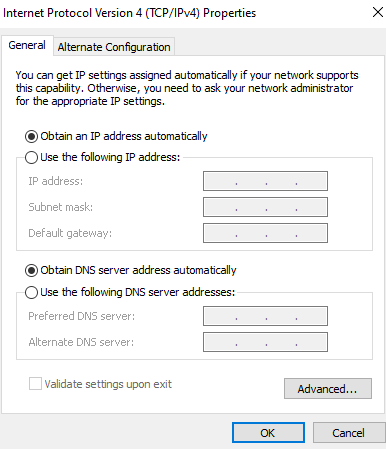
- Now, reconnect to your network, and the issue will be resolved.
Flush DNS settings
The incorrect custom DNS settings can cause the disconnecting network adapter issue on your Windows 11 PC.
When you flush the DNS settings, all the values are set to default which can help fix the issue.
- Open the Run dialogue box by pressing the win key + R. Write cmd and press Enter.
- In the command prompt, write ipconfig /flushdns and press Enter. The DNS settings will be reset to your default.
After you receive the confirmation message, reboot your PC and check if it resolved the issue.
Reinstall the network adapter
If you have tried all of the above fixes and still failed to solve the issue. You should try to fix it by reinstalling the network adapter.
- Right-Click on the windows icon and select device manager to open it.
- Inside the device manager, locate network adapters in the list and expand it.
- Right-click on the wireless adapter and select properties.
- Select the Driver tab from the top bar.
- Inside the driver tab, click on uninstall, and then again click on uninstall.
- When the uninstallation process completes, there will be no internet connection.
- Restart your computer. The system will automatically detect the missing driver and reinstall it on your computer.
By doing so, the issue of consistent disconnection of the network adopter will be resolved.
Reset Network Settings
You can reset the entire network stack to solve the problem.
Open settings by pressing win key+ I. Select update and security.
Search for the network reset option and click it to reset the network settings.
When the process is complete, reboot your computer and check if the issue is resolved or not.
Conclusion
For many users, these fixes work to solve the issue of network adapter disconnection on windows 11. If all the above methods failed to fix the problem. You will have to reinstall your windows 11. That will definitely solve the problem.
