Here you will find four different methods of adding vertical lines in Google Docs in easy steps. Just follow the instructions.

We can add vertical lines in google docs by:
Drawing option
Adding paragraph borders
Adding vertical column separators
Press "Shift" and the vertical line key below the backspace key.
If you want to learn these methods in detail. Just relax and scroll down the article.
Drawing option
- When you open your google doc, search for the insert option in the menu bar and click on it. Another menu will appear downward.
- Select the third option, which is a drawing option in the dropdown menu.
- If you already have saved the template in google drive, you will select the "from drive" option, or you have to choose the "new" option to create a vertical line.
- When you select the new option, another window will appear in front of you, where you can draw the vertical line.
- Select the line and choose the type of vertical line you want to draw.
- After choosing the line design, you have to drag the cursor downward on the screen to draw a vertical line. Make sure that the line drawn is straight by pressing shift on your keyboard.
- You can change the color of your line and adjust the thickness and thinness of the line. Apart from that, you can also change your line from the dash to dotted. Google doc also gives you an option of formatting the start or end of the line.
- After you are done with your line formatting, save and close by clicking on the save and close option. The line will appear at the place of the location of your pointer.
This method can be used to separate your paragraphs. The following procedure is used to draw vertical lines on the borders of your paragraphs.
Paragraph borders
Paragraph borders are used to beautify or emphasize your paragraph by making borders of the vertical lines surrounding the paragraph. In google docs, you can draw them like this:
- First, move your blinking cursor and place it from where you want to start in the vertical line. After that, go to the menu bar to search for the format tab and click it to see its menu.
- Search for paragraph style in the Format menu and click on it. Another menu will appear on its right side.
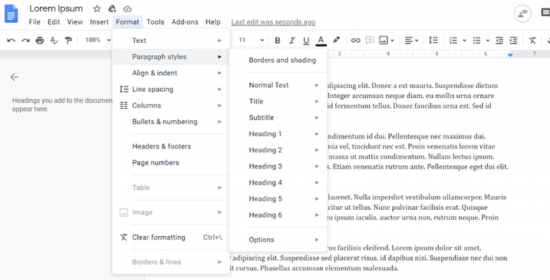
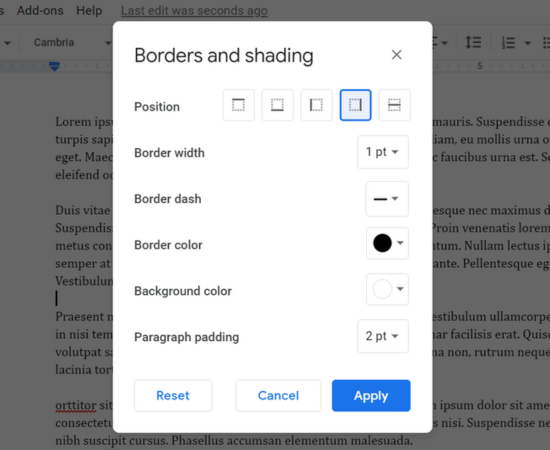
- Select Border and shading on the paragraph style menu, and you will see that a new window will be opened.
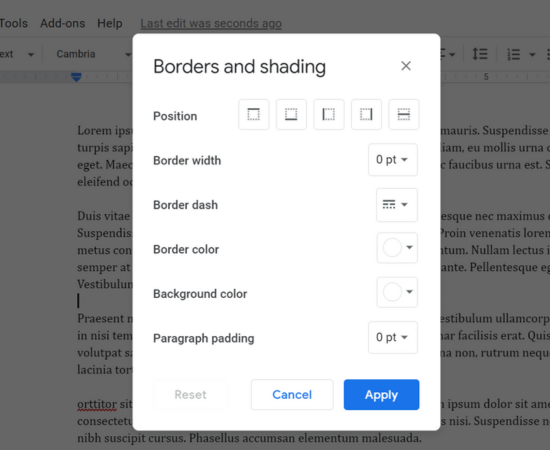
- From the position section of this window, you can select the left/right or the left and right border options.
- After selecting your border positions, you can format your border style and color by adjusting different style options available on the "border and shading" window.
- After completing your formatting, click on apply, and the borders will automatically appear on the right and left sides of the paragraph.
Adding vertical column separators
- From the menu bar, select format.
- Search for the column option in Format and click on it.
- By opening the column section, another menu will appear in front of you.
- Then you will click on more in the column menu.
- Select the column number and column space. For inserting vertical lines between columns, tick the box of "line between columns" and click on "apply," and you will see that vertical lines will appear in your document.
Pressing "Shift" and the vertical line key
- The last method is quite simple. Just put your blinking cursor before the text where you want to put the vertical line.
- Then press "shift" along with the vertical key, right below the backspace key. That's it. The vertical line will be drawn right where you want it.
How to remove a line?
It's simple. First, select the line and then press the backspace or delete, or if you want to remove the paragraph border's line. Select the border and shading option, click on the reset option, and click apply. The borders line will be successfully removed.
