Like many other things in your home, a router is a multi-functional thing. There are a lot of functions that a router can do for you and your home network, from sharing data to adding special features. Some routers allow you to block whole IP addresses, including their own. This feature is extremely helpful because it can resolve network problems caused by computers with unauthorized addresses on the LAN (Local Area Network) or WAN (Wide Area Network). This article will show step-by-step how to block IP address on router in Windows 10.
Blocking specific IP addresses can help you have increased speed and control the traffic of your websites if you own any. However, different routers have different UIs (User Interfaces), so blocking an IP address on other routers may seem foreign. But actually, it is not.
In this article, we will show how to block IP addresses on D-Link and TP-Link routers so that you can spot the minor differences and apply them to any router you own.
Blocking IP Address on D-Link Router on Windows
An option called “Static Route” on router settings blocks the specified IPs from flowing through your network. To apply the static route rules on a D-Link router:
- While connected to the router, open any browser and type “http://dlinkrouter.local/” on the address bar.
- Alternatively, typing “192.168.2.1, 192.168.1.1, or 192.168.0.1” on the address bar will also work.
- Now, sign in using the admin name and password. (For D-Link, the default name and password are usually “admin”).
- Hover the cursor over “Advance” and click on “Static Route” from the drop-down menu.
- Click on “Add Route.”
- In the menu, fill up all the information asked.
The image below shows an example of blocking a Google DNS server IP (8.8.8.8). You have to put it in the “Destination Network” field.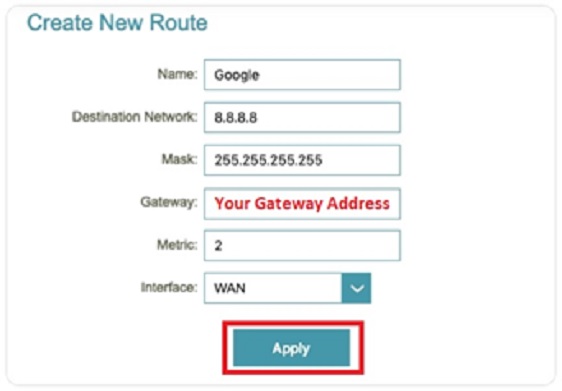
- Give any name you want in the “Name” field, but it is better to keep the name relatable to identify later.
- In the “Getaway” field, type your router IP (192.168.2.1, 192.168.1.1, or 192.168.0.1).
- The rest of the fields will be similar to the example image. Click “Apply.”
This will block the IP that you have entered in the “Destination Network” field.
Blocking IP Address on TP-Link Router on Windows
Opening the router admin panel is the same as D-link. After you have logged into the router admin panel, follow this:
- Click on the “Advanced” button above and then go to “Network.”
- In the list, find and click on “Advance Routing.”
- Go to the “Static Routing” section and click on the “+ Add” button.
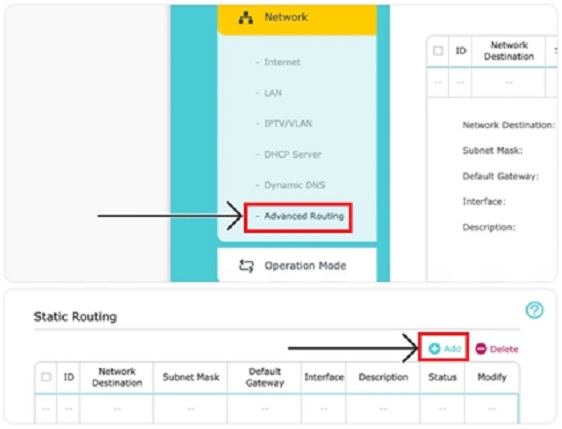
- Input the required IP that needs to be blocked in the “Network Destination” field.
- Fill up the rest of the fields as shown below.
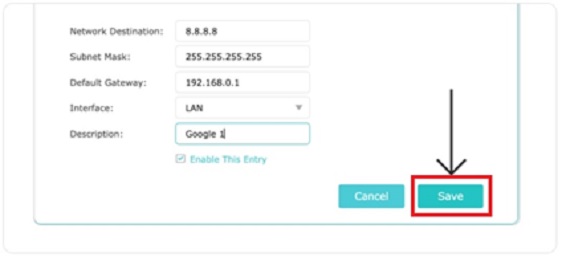
- Click on “Save.”
If you wish to add more IPs to block, click the “+ Add” button again. Otherwise, that’s all. If you use an older TP-Link router, the option will be found directly from the Admin Panel > Advanced Routing > Static Routing.

So you can see that there is no significant difference between the two routers. If you own any other router, you can follow these steps. You have to find the “Static Routing” options.
Some Post Procedures
To check if your desired IP is blocked or not
- Launch the command prompt in Windows.
- Type the IP to check ping like this: ping 8.8.8.8 and hit enter.
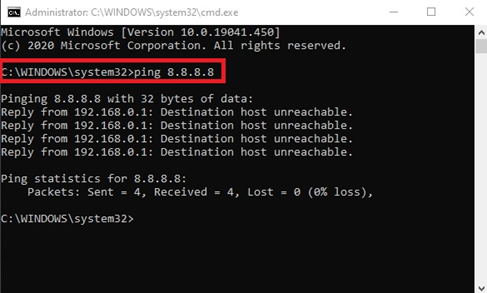
If the reply shows that “Destination host unreachable,” that means the IP is successfully blocked. If not,
- Turn off the router and unplug it.
- Wait 30 sec and then turn it back on.
Now when you check, it should work.
Summary: Lock IP Address on Router on Windows
- Go to Start, type ncpa.cpl in the Start Search box, and then press Enter.
- Right-click the network connection that you want to configure, and then click Properties.
- Right-click the appropriate Ethernet or wireless adapter, and then click Properties.
- Click Internet Protocol Version 4 (TCP/IPv4), and then click Properties.
- Click Use the following IP address.
- In the IP address, Subnet mask, and Default gateway boxes, type the IP address settings that you want to use for your hardware configuration manually for your machine on the intranet or extranet you want & Click OK twice to accept the changes .
