As a Zendesk Customer Support Manager you have no doubt been asked “How to check Zendesk voicemail recording?” recently. As for me I’ve seen plenty people struggling with a simple question and I thought it was the right time to get an answer. In this article, I want to share with you how to access the Zendesk voicemail and how to check Zendesk voicemail contents.
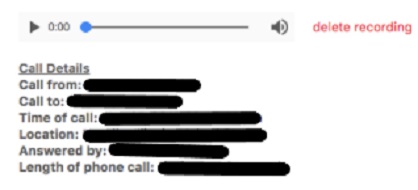
When you can't answer your customer’s calls due to various reasons, this is where Zendesk comes in to help. You can use the Zendesk voicemail feature if you have Zendesk. Zendesk Talk has a built-in voicemail option for you to check later. When the user records a voicemail, a ticket pops up with the voicemail. You may also attach the voicemail inside the ticket. The maximum limit of a voicemail is two minutes.
In this guide, you'll find the steps to help you set up, configure voicemail recording so that you can check it later.
Setting up your voicemail
If you wish to apply voicemail at the Sell section for customers, you must instruct the required work for the Sell. As you can be offline or not free, and configure the voicemail reception as well, which you want to play for the customers. For setting up voicemail:
- Click on the Settings icon of your Zendesk webpage and go to “Communication Channels” and select “Voice and Text”.
- Navigate to the lowermost option to the “Inbound calls section” on the “General” page.
- As you are unavailable to reply, click the “Forward to voicemail” option.
- Click “Default greeting” for your reception settings. You may further adjust your reception. Listen to the greeting for preview and apply changes.
- If you wish to upload your reception, Select the “Need your own message?” link. And, upload the audio file.
Configuring voicemail settings
- Click the “Admin” icon and then go to “Channels” and select “Talk”.
- Select the “Lines” icon. Select the line you wish to modify your voicemail features and after that, click the “Voicemail” option.
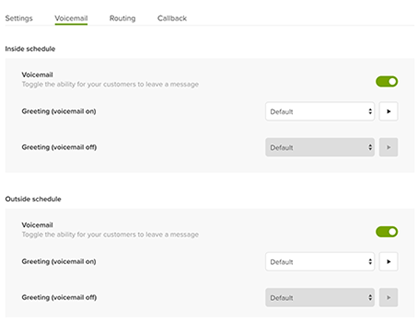
- There will be a list of Configuration Settings. Select the settings you need:
• Voicemail: You can turn your voicemail on or off. Voicemail is enabled by default.
• Greeting (voicemail on): Select your voicemail greeting you want the customers to hear when a voicemail is on. You have to enable your voicemail before you apply this setting.
• Greeting (voicemail off): Choose your welcoming voicemail that you want the consumers to listen to at the time of voicemail off. This option will be available when a voicemail is disabled in your system. When your voicemail is closed, create a custom reception that doesn't tell users to record a message.
• Transcribe voicemails: You can turn transcription on or off. Voicemails recorded in English are interpreted as the emerging ticket. Without English, different languages are not interpreted.
• Delete voicemails: This will automatically delete voicemails after a given amount of time. If you want to keep all the voicemails, just select “Never”. Although voicemails get deleted from a ticket if the demand is fulfilled, it will not delete the transcriptions.
Managing greetings when a voicemail is off
If you want to manually change the Available agents greeting for a number to a custom version:
- Select the “Admin” option from the bar at the side. And, go to “Channels” and choose “Talk”.
- Choose the “Lines” option. Select the line for which you have immobilized voicemail. And, you wish to modify.
- Go to the “Settings” option and select the customized version you want in the “Available agents greeting (voicemail off)” option.

Alerting when you have a voicemail
When you receive a voicemail from a consumer online or offline, you will receive an announcement signal in your notification board. A ticket will also be issued along with the voicemail.
Summary: check Zendesk voicemail recording
- Go to zendesk.com
- Enter the account name of your team (for example, mycompany).
- Click the Sign in button.
- Select Admin settings, click Help Center and click on the category or section you want to open.
- To preview an article, click Preview, then select a language from the drop-down menu at the top of the page.
