This article will show you how to export tickets in Zendesk. You'll need to use your API token for the export. I’ve also provided a sample PowerShell script on my blog that will do most of the work for you (see step 5). The first thing we need to do is authorize our Zendesk account to use Zendesk API token (look at the comment history below). That way, we can export all data as JSON and parse it later.

If you want to secure the information in your Zendesk account, you have to export tickets or data. It may be a bit tricky as data export isn’t spontaneously allowed in every account. You have to get in touch with the ‘Zendesk Customer Support’ to activate the feature if it is unavailable in your account. A Professional or Enterprise edition is a must to enjoy this facility.
If you don’t have these versions, convert your current one to these versions. When you enable data export, you can name a certain email domain. Then, within your Zendesk profile, admins may export necessary data. You can use your e-mail domain by default.
You may additionally modify the domain as you like. If you wish to allow data export from your Zendesk profile, first communicate with the Customer Support of Zendesk. For registering a subdomain name to your Zendesk Support.
Changing the email domain to export information
- First, click on the “Admin” logo (gear icon) in the right section of the webpage and then go to “Manage” and click “Reports”. Click the “Export” icon if you want to find out about the export options if needed. Bear in mind that the export feature wouldn’t be available except that you have an Enterprise or a Professional worker and communicate with Zendesk requesting them to permit data export.
- After approval, you can change the domain using the “Approved email domain” option.
 If you forget to name, the export data option won’t be restricted to owners in a certain domain. As a result, each Zendesk Support admin will have the authority to export necessary data. Despite having personal email domains. Put a value there so that admins have to log in with the permitted email domain to handle the data extraction feature. Click “Save” to apply changes.
 - To disable data export, click on “Admin” and go to “Manage” and select “Reports”. Hit “Disable exports”. And, select “Ok” to confirm.

Exporting data to a file for download
- Hit the “Admin” logo and go to “Manage” and select “Reports”. Select the “Export” icon if you want to present the data export features. If you are in a Zendesk legacy version, the export options will be in a different tab. If you have the data export option enabled, but the option is not visible, the reason for that is you may have restricted usage on email domains and you may not be logged in to your verified email domain.
- Choose an export option for your data. For JSON exports, Choose the criteria for exporting data. Then, select the “Export” icon. If your account 200,000 tickets or more, then JSON export is recommended for you.
- If you want to do CSV or XML file exports, click on the “Request file” option next to the “Appropriate export” icon. A background task will start and you will be notified with a link via email after completion.
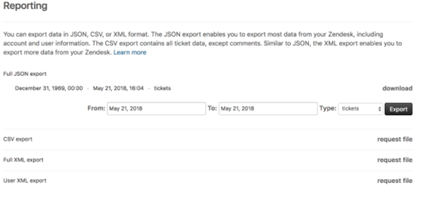
- Download the zip file given in the link for your report.
- The link will not expire before 3 days.
- Select “latest” beside User XML export, Full XML export, Full JSON export, or CSV export for getting the email notification. After that, you can easily download the recent report.
Summary: Export tickets in Zendesk
- You will get a single file with known information about your tickets, including the ticket number, ticket subject, and ticket description.
- You can export all the tickets in your account or just specific tickets by filtering them and sorting them by date.
- You can also filter and sort the exported information.
