How To Delete Downloaded But Not Installed Updates In Windows 10?
529 Views
If you’re a Windows 10 user, you might have noticed that there are updates for your computer waiting to be installed. Under normal circumstances, you won’t need to deal with the downloaded updates since they will be automatically installed one by one. However, if you are using the ‘metered connection’ feature, then this will not happen and the downloaded updates won’t be installed until you go through the ‘Update and Restore’ wizard. At some point, you might want to clean up your computer and delete all the downloaded updates that stay on your system taking up space.
Downloaded Windows 10 updates that weren’t installed are quite bothersome. This issue may prevent you from downloading the new Windows 10 completely or would take up space in your computer storage.
Windows 10 updates are automatically downloaded in your device unless you disable this feature. However, you want to be careful about disabling this feature though as you may find it hard to install updates in the future.
When you face difficulties with updates, you’ll be worried thinking about what had gone wrong. This concern, however, could be remedied by deleting your downloaded Windows 10 updates.
Here are some steps on how to do so
Delete through File Explorer
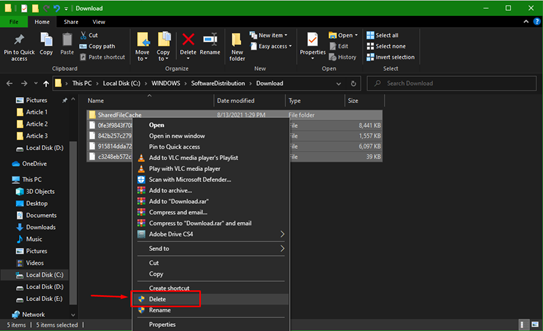
- Open your Windows 10 File Explorer
- Go to the explorer’s address bar and paste this C:WINDOWSSoftwareDistributionDownload.
- Hold down CTRL + A to select the entire files found or copy them through your mouse.
- Press Delete on your keyboard.
- Windows may request you to delete all these files. Click “Do this for all items” to proceed with the deleting process.
- Restart your computer then check for any updates. You can determine if all the issues have been fixed this way.
Delete through Notepad
- Open your Notepad.
- Copy and paste this command:
net stop wuauserv
cd /d %SystemRoot%SoftwareDistribution
del /s /q /f Download
net start wuauserv - Press CTRL + S to save the file but make sure you have saved it to a file having *.cmd extension. You can place the file into your desktop for easy access.
- Through your mouse, hold down the right-click button and click “Run administrator.”
- You are done. Now restart your computer and check if any updates are available.
Delete temporary and system files
This process is designed to remove any unfinished downloaded Windows 10 updates so you can successfully download another one. Unfinished updates are caused by system crash, improper shutdowns, failure in the Registry, or not enough storage. Here’s how you can fix them:
Deleting temporary files
- On the taskbar type “disk cleanup” and click on it once successfully searched.
- On the “Files to delete” section, select the file you want to remove. Select it to get the description of the file you want to delete.
- Click “OK.”
Delete System files
A system file is a permanent file in your device. These are critical files as without them, your computer system would not work efficiently. However, you sometimes need to remove them so you can install a corrupted pending Windows 10 update you have downloaded. To do this, follow these steps:
- Search the “disk cleanup,’ on the taskbar. Then click “clean up system files” on the list that would appear.
- Click the file you want to remove. Click the file to know the description of the file you want to get rid of.
- Click “OK.”
Final Thoughts
These guides may be difficult to look at, but they’re actually easy to do. They’re useful especially when you encounter issues with downloading Windows 10 updates or you just want the previous version.
Don’t worry about following these steps as they won’t harm your computer. In fact, they’re the only way to solve your Windows 10 updates’ problems.
Summary: Delete downloaded but not installed updates in Windows 10
- Open Settings.
- Select System.
- Choose Storage from the left pane.
- Click on Configure storage sense or run it now under Free up space now.
- You will get the option to automatically delete unneeded files. You can disable/enable it. Below, you will find the option to delete temporary files.
- Select the options that you want and click on Remove files button.
- The process of deleting temporary files will start immediately and may take some time depending on the total size of temporary files stored on your PC.
