The iOS Photos app can be set to automatically sync which means every time your iPhone or iPad opens the Photos app, it will also open on your computer. This is convenient as you don’t have to worry about finding any missing synced photos. But if you have a lot of photos, this can take a long time and strain your battery. So in this article, we’ll tell you how to turn off the auto sync feature on your iPhone and make the Photos app load faster.

You can easily remove the iPhone camera captured photos from your iPhone. But synced photos can’t be removed from your iPhone device. iPhone doesn’t show the delete option for synced Photos.
So, the deletion process of synced photos from the iPhone will be detailed here.
Deleting Synced Photos from iPhone with iTunes
- Link the iPhone with the PC with the help of a USB cable.
- Allow your computer to access the information of the iPhone.
- Open iTunes.
- Tap on the Phone shaped icon.
- Select the Photos option from the left side menu bar.
- Go to the Sync Photos section and uncheck it.
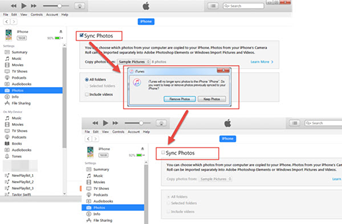
After that, a new dialogue box will pop up on the screen. If you are sure about deleting the previously synced Photos;
- Click on remove.
- Close the window.
This is the first method of deleting synced photos from the iPhone with the help of iTunes. Sometimes we choose our sync photos to iPhone using a third-party application. The transferred photos are saved in a folder named 'from My Computer' folder.
Only unchecking the synced photos may not delete the photos entirely. So you have to make an empty folder to delete the synced photos.
To do that;
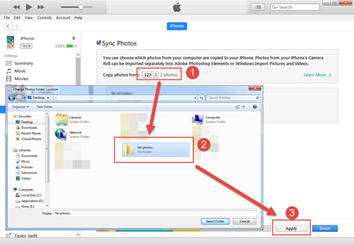
- Go to Computer.
- Create a new empty folder.
- Hook up your iPhone to iTunes.
- Press the Phone Shaped icon to go to the synced photos.
- Enable the sync photos.
- Go to the ‘Copy Photos from’ option.
- Access the drop-down menu. Go for Choose Folder.
- Click on the empty folder to pick it.
The newly created empty folder is selected. Now;
Click on Apply at the lower right part of the window.
This will allow iTunes to start the syncing process. Once the process has finished, the empty folder will replace all the sync photos from the ‘from My Computer’ folder. The method mentioned above can be done using any computer. If you wish to operate Mac OS;
- Connect the iPhone to the Mac.
- Click on your device.
- Select Photos.
- Find the selected album option.
- Select the albums that you want to remove.
- Uncheck those albums.
If you wish to remove all the synced pictures at a time.
- Uncheck the ‘Sync Photos from’ option.
- Click on the remove button from the pop-up window.
- Click Apply to finish the deletion process.
Disadvantages of Using iTunes
- The whole process is lengthy.
- It doesn't work for a larger amount of photos.
- This process is not friendly for removing selected photos. Sometimes, it accidentally deletes the photos that you don’t want to be deleted.
Deleting Synced Photos without iTunes
There are several iPhone manager apps in the App store that helps to delete the synced photos from your iPhone. DearMob iPhone Manager is one of them.
- Collect the App from the provided link.
- Launch DearMob iPhone Manager.
- Join the iPhone to your PC with the help of a USB cable.
- Select the Photo Transfer option. You will find it on the main interface. Then, press on it.

- Select the unwanted synced Photos.
- Click on the Delete Photos option from the top of the display.
- Navigate to the lower right part of the window. Go for the sync button.
In this way, you can delete the unwanted synced photos from your iPhone without iTunes.
Summary: Delete Synced Photos from iPhone
- Open Settings.
- Tap General.
- Tap iPhone Storage.
- Select Photos.
- Scroll down to Synced Albums.
- Tap a synced album.
