When using web hosting for your website, it can be really helpful to integrate graphics into your page. Sometimes, we may want to upload a screenshot or a screenshot of some other program. It can also be useful to take a snapshot of a projecting screen or something else. With integrated graphics, there is no need for an additional graphic card – all this functionality can be achieved without an additional card! If you are looking for instructions how to disable integrated graphics in BIOS, then you are in the right place! This article will tell you about the options for activating / deactivating integrated graphics and provide instructions on how to do it.
If you want to install and operate a new graphics card on your computer, you may need to disable the integrated graphics. You can do this by entering the BIOS setup of your computer. BIOS means “Basic Input / Output System.”
If you disable your integrated graphics from the BIOS menu, you can easily use the newly installed graphics card. The BIOS setup menu looks different for different motherboards. This article will show you how to disable integrated graphics in a few different BIOS menus.
The General Process
In general, you can follow the given steps to disable integrated graphics:
- Open the BIOS setup menu on your computer. You can use the F1, F2, F11, F12, or the “del” button to open the BIOS. This button is different for different computers.
- Find the option called “Integrated Peripherals” or “Onboard Devices.”
- These options may be inside the “Advanced” tab or directly in the general menu.
- Find an option that is similar to “Onboard Graphics” and disable it.
- Now you can “Save and Exit” the BIOS setup.
If you don’t find the “Save and Exit” button, keep pressing the “Esc” button on your keyboard until you find it.
Using the Aptio BIOS Setup Utility
The “Aptio BIOS setup” was developed by “American Megatrends,” and you can use the following steps to disable integrated graphics in this BIOS utility:
- Open the BIOS setup.
- Navigate to the “Advanced” tab.
- Find “Chipset Configuration” and enter this setting.
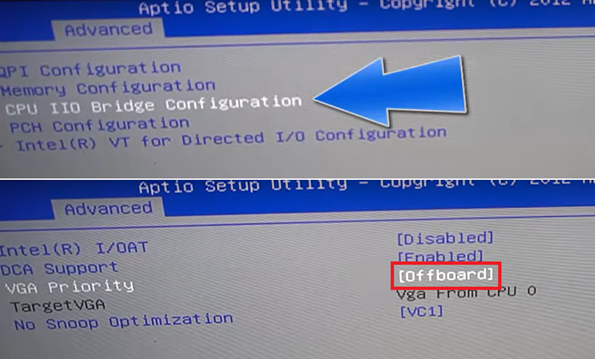
- Enter the “CPU IIO Bridge Configuration.”
- Go to the “VGA priority” option and change the “onboard” option to “offboard.”
- Press escape, and when the dialogue box opens, press enter on “Save” and exit the BIOS setup.
Using the M4N68T-M-V2 BIOS Setup
- Open the BIOS settings and go to the advanced tab just like before.
- Open the “Chipset” menu.
- Now open the “SouthBridge Configuration.”
- The top option will be “Primary Graphics Adapter.”
- There will be two options called
a). PCI-E -> PCI -> IGP
b). IGP -> PCI -> PCI-E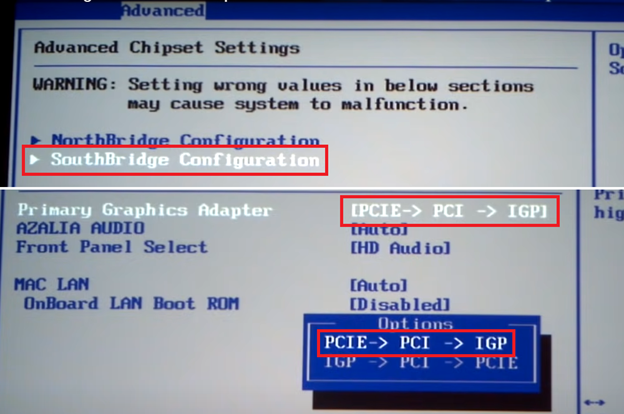
- Choose the first one and hit “Enter.”
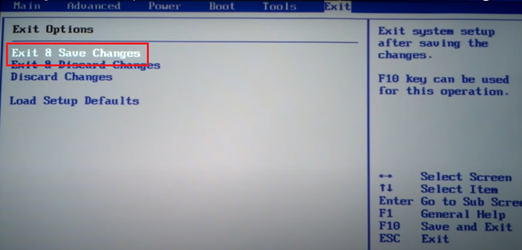
- Keep pressing escape until you reach the “Exit and Save Changes” option.
- Hit enter on “Exit and Save Changes.”
This process will disable the integrated graphics in this BIOS setup.
For Asus Laptops
The BIOS setup in Asus laptops will not allow you to disable the integrated Intel or AMD graphics. But you can always change the primary display settings to make it use the external graphics card. To do this:
- Enter the settings in BIOS.
- Navigate to the “Advanced” tab and hit “Enter.”
- Open the “Chipset Configuration” option and then open the “Internal Graphics” menu.
- Disable the “Internal Graphics Mode.”
- Alternatively, you can set the mode to PEG/PCI and hit “Enter.”
- If the “Multi-Monitors” option is available, disable it.
Now you will be able to use your monitor or display a through the external graphics that you have installed instead of the integrated graphics.
Disabling Switchable Graphics
You can disable the switchable graphics option to disable the integrated graphics. Here I am using a Dell laptop to give an example.
- Turn on the laptop and press and hold the F2 button.
- It will open the Dell laptop’s BIOS setup.
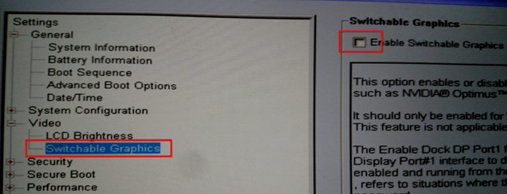
- Expand the “video” option from “settings.”
- Select the “switchable graphics” option.
- From the right side, uncheck the box that says “enable switchable graphics.”
- Save and exit the BIOS setup.
It will disable integrated graphics in your Dell laptop. If you are using any other laptop, for example, HP or Acer, you can do the same. But the names of the options might be a little different.
Summary: Disable Integrated Graphics in BIOS
- Restart and enter your BIOS.
- Use the arrow keys to navigate through the BIOS menu to find the configuration settings.
- Navigate to the Integrated Peripherals > Onboard GPU configuration.
- Select ENABLE to reset onboard GPU.
- Press F10 or F12 to save and exit.
