How To Do Screen Recording In Windows 10 Without Third-party App?
1184 Views
Are you a Windows 10 user? Does your computer have built-in screen recorder and you are wondering why you would use other screen recorder software, like OBS Studio? In this article we'll show you how to do screen recording in Windows 10 without third-party app and tell about another free software with extensive functionality that allows you to record any activity on your desktop.
Whether you intend to create a video tutorial for your channel, record gameplay, or simply capture what have you done on-screen intending to view later on, screen recording would be able to perform this task best.
With Windows 10, you would not need to install a third-party screen recording app to start doing
so. This is because Windows 10 already has the Xbox Game Bar that can complete the job for you. It is a screen recording utility that comes with the Xbox app which is installed by default in Windows 10.
If you’re new to this and do not know how this works, then below are the steps you may follow to start screen recording as soon as you need to.
How to Screen Record in Windows 10?
Step 1: Open the app you intend to record or capture.
Since there are some apps the tool can capture such as File Manager or the desktop itself, you must first choose which app you want to record. The Xbox Game Bar works on regular apps whether desktop apps or those from the Windows Store.
Step 2: Simultaneously click the Windows key + G.
After doing so, the Game Bar Dialog should appear. Check on the ‘Yes, this is a game’ to proceed. Whether or not it is a game you’re recording, if you intend to capture the screen, then it is okay to check it.

Step 3: Start Recording.
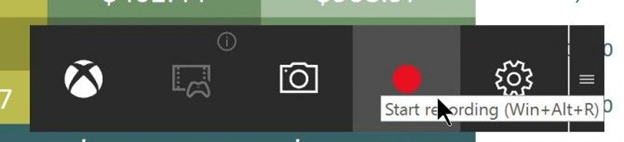
Afterward, there should be a red button on the center which serves as the start recording button. So whenever you are ready to record, you may go and click on it, or as a shortcut, you may simultaneously click Win + Alt + R. When you start, the red recording bar will then transfer to the top right of the program window.
Step 4: Click on the red recording bar to stop the screen recording.
If you’re done, then you may go ahead and click on the red recording bar on the top right of the screen to stop the recording. If you accidentally hide or close it, don’t worry because you may simply bring it back by clicking Win + G.

Step 5: Finish.
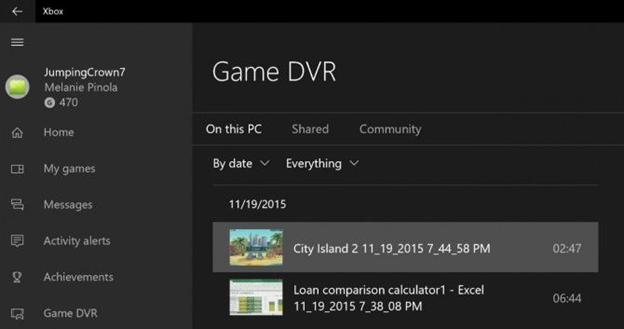
After following all those steps, you’re done! The saved screen recording video can be found in a subfolder of the Videos Folder which is named Captures. The video files are saved as MP4 files. Your captures may also be found, trimmed, and shared with other people in Xbox live (especially if it’s a game) in the Xbox App under the Game DVR menu.
Also, take note that aside from screen recording, the Xbox Game Bar can also be used to take screenshots! To do so, instead of clicking on the red recording button, opt to click on the camera icon found on the game bar, or as a shortcut, you may go and click Win + R + PrtScn.
Summary: Screen recording in Windows 10 without third-party app
- Using the Game Bar
- Capturing screenshots and recording videos of Windows PC games is easy with the Game Bar in Windows 10.
- Press Win+G, and a small bar pops up, with a video-capture button, and links to the Xbox app.
- Click on the Capture button to start recording.
Conclusion
Screen recording is a very useful tool that you can use in almost any situation, most especially during a pandemic when we are all stuck in our homes with some of us taking online classes. This is very helpful for educational, business, or leisure purposes, and knowing how to do this would benefit you a lot more than you would expect.
Unlike what one expected, there is no need to install a third-party app for your screen recording, and hopefully, this was helpful for you. If you know someone who would greatly benefit from this then you might want to inform them as well.
