Have you ever wondered how to set priority to Windows 10? This article will describe you which tools of the utility can help you to deal with the operating system and its processes.
Setting priorities to Windows 10 helps your device to run smoothly and operate effectively. Besides the “Affinity” which determines the effectiveness of the processor core, there’s also a “Priority” that controls the computers resources and memory space. The higher the priority of your device, the more resources will be devoted in the process.

This article will teach you how you can set priority in your Windows10. But before we go further, it’s important for you to first know the basics about setting the priority. There are 6 priority levels available in your Windows10, namely:
- Realtime (the highest level)
- High
- Above normal
- Normal (default level)
- Below Normal
- Low (the lowest level)
Normal is the average and default level, hence exceptionally reliable to use. Most programs run smoothly with this priority level. If you want to improve or speed up the quality of your programs, you can just increase the priority level. On the other hand, if you want to minimize the resources your app would consume, just slow down or decrease the priority level.
Although the Realtime level is the highest level, it is not as reliable as you may think. In fact, this is not meant to be used. This is because it highly affects the program’s performance as it usually causes system instability. With this priority level, the program is likely to consume 100% of your CPU, and cause keyboard and mouse lags. For this reason, your Windows 10 may be unusable.
Now, that you know the basics, here are two ways you can set the priority levels in your Windows10:
Method 1: Change priority level through the Task Manager
- Click the search icon found beside the windows icon.
- On the search bar, type “task manager.”
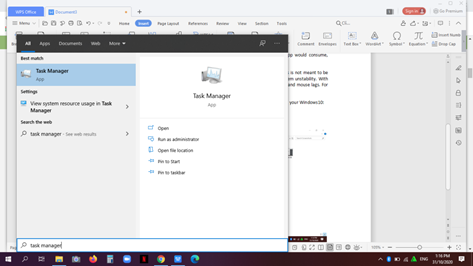
- Once you click on the task manager, you will see, “more details,” click to open.
- On top of the Task manager window, you’ll see the “Details” tab. On this tab, find the processes you want to change the priority level.
- Right-click on the program you want to change the priority. After you’ve done so, you’ll see the “Set priority,” option.

- Point the cursor to this option to see the breakdown of the priority level choices. It’s now time to choose which priority level you want to use on specific processes.
Method 2: Change Priority Level Through wmic
Follow these steps to do this:
- Open a command prompt.
- Copy paste or type this input on the command prompt.
wmic process where name="Process Name" call setpriority "Priority Level". - Substitute the “process name” with the process you want to change the priority level, for instance, “notepad.exe.”
- After you replace the “process name,” replace the “priority level” with the priority level you.
It should be like this, wmic process where name="notepad.exe." call setpriority "below normal"
For your reference, here are the various priority level available on the command prop with their corresponding value:
PRIORITY LEVEL VALUE PRIORITY LEVEL NAME
256 Realtime
128 High
32768 Above normal
32 Normal
16384 Below normal
64 Low
Final Words
You need to be careful when it comes to setting priorities in your Windows 10 PC. Instead of improving the performance of the program, changing the priority level of programs in windows wrongly can negatively affect the performance of the program.
For safe option, it is always best to stick on the default setting or change it to a lower setting. For example, if X and Y have a normal priority level, but Y needs high CPU intensive, you can lower down X’s priority level. This hack helps to prevent lags, crashes, or system error in your device.
Summary: Set priority to Windows 10
- Go to task manager.
- Top of the window click on more details.
- Scroll down to your desired app.
- Right click on app and select go to details.
- Click on the Details tab.
- Right click the process name and select Set Priority > High or Realtime if you want it to have even more CPU time than that.
- Repeat the step for all apps you wish to have high priority by default. For example, I have Chrome running with real time priority so that it has more CPU time than anything else - however I still have lots of CPU time left over so this doesn't affect other programs performance at all but it does make Chrome always responsive no matter what else is going on.
