Amazon WorkSpaces is one of the most innovative tools that you can use to cut costs and simplify your business processes. It's a virtual environment which offers a wide open whiteboard, group chat, and file sharing capabilities in a secure sandbox that ensures data quality and productivity. However, not everyone has the licence key to access Amazon WorkSpace. If you are looking to try out this service and then move on to another better solution, this article will show you how to setup your Amazon WorkSpaces public session.
AWS Work Spaces is a cloud-based virtual computer. Generally, like other AWS services, it is managed by the AWS System Manager console. To start a public session in AWS WorkSpaces we have to make the instance with the same VPC and sub-net which was used to create the AWS Work Spaces.
Before starting the session we have to create a Session Manager.
Session Manager setup:
Session Manager Pre-requirement:
- Session manager only supports Windows, MAC, and Linux operating systems.
- SSM agent must be installed in the instance before setting up the session manager, the version is SSM Agent version 2.3.68.0 or later.
Creating an IAM instance profile
Here creates an account of the IAM instance to connect with a session manager. If you have created an IAM Instance profile just verify the profile with the Session Manager.
Controlling the user session access to the instance:
By this control, you will be able to which user can access the product and which just can’t access it. Here you can control the access by providing some default policies besides you can create and control your customized policies.
Configuring the session preference:
At the time of your session, you can customize your session with some preference. Here is some example of preference’
- Configuring the session timeout.
- Which instance can run the session like the Linux instance?
- Creating the session history and share it. And many more.
Restrict the access to commands
- At first, go to AWS Systems Manager console at https://console.aws.amazon.com/systems-manager/
- Choose ‘Documents’ from the navigation panel.
- Click on the ‘Create command or session’
- In the name section, set the document name.
- At this time select ‘Session document’ as the document type.
- Enter YAML or JSON code in the console:
a). Enter the code in the YAML section like this’---
schemaVersion: '1.0'
description: Test description
sessionType: InteractiveCommands
parameters:
logpath:
type: String
description: The log file path to read.
default: "/var/log/amazon/ssm/amazon-ssm-agent.log"
allowedPattern: "^[a-zA-Z0-9-_/]+(.log)$"
properties:
linux:
commands: "tail -f {{ logpath }}"
runAsElevated: true
b). Or enter the JSON section like this,
{
"schemaVersion": "1.0",
"description": " Test description ",
"sessionType": "InteractiveCommands",
"parameters": {
"logpath": {
"type": "String",
"description": "The log file path to read.",
"default": "/var/log/amazon/ssm/amazon-ssm-agent.log",
"allowedPattern": "^[a-zA-Z0-9-_/]+(.log)$"
}
},
"properties": {
"linux": {
"commands": "tail -f {{ logpath }}",
"runAsElevated": true
}
}
}
c). At last, click on the ‘Create document’
AWS Private Lint setting up to VPC
Connecting the VPC with AWS Private Lint lets you feel safe and make the environment fully safe. By this only you will be allowed to access the system by your network. Your system can not be accessed by a public network.
Disabling & enabling SSM user account administrative permissions:
This is an optional option, if you want you can take action SSM user from here.
Enable SSH connection:
This is also an optional action, to experience the best you can enable it.
Starting a Session with System Manager Control
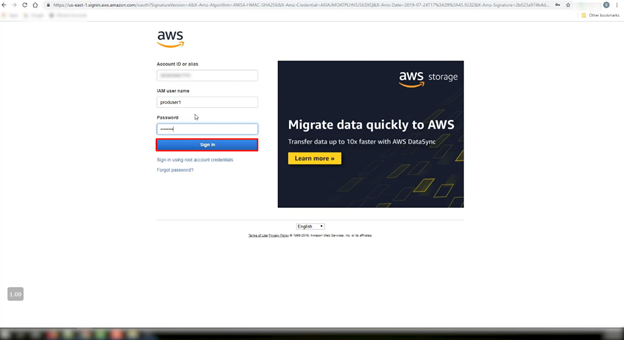
- To start a session at first go to the AWS Systems Manager console at https://console.aws.amazon.com/systems-manager/
- Give your username and password. Click on the sign-in option.
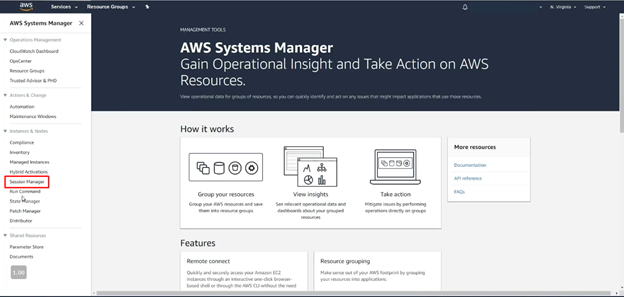
- Click on the ‘AWS System manager’
- Now it will take you to the AWS System manager homepage, at this time click on the ‘Menu icon’.
- From the navigation panel click on the ‘Session Manager’
- Now choose which session you want to start.
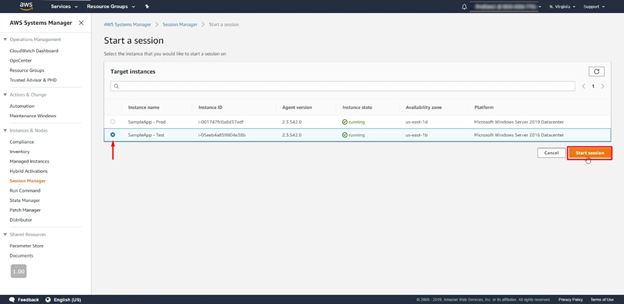
- At last, click on the ‘Start Session’.
Now your session is ready to use publicly.
Summary: Setup Amazon WorkSpaces public session
- Go to the Amazon WorkSpaces console.
- In the navigation pane, choose WorkSpaces.
- Choose the WorkSpace you want to connect to, and then choose Actions > Connect.
- In the Client section of the Connect WorkSpace dialog box, choose Get WorkSpaces client and follow the on-screen steps to download and run the installer.
- If prompted, do one of the following:
- Your WorkSpace automatically opens in a browser window when it finishes connecting.
