How To Transfer ITunes Library To Another Computer In Windows 10?
526 Views
- How to Transfer iTunes Library?
- Step 1: Consolidating iTunes Files
- Step 2: Creating An XML File
- Step 3: Copying The Files Onto External Drive
- Step 4: Preparing The Environment Of New PC
- Step 5: Copying The Files Onto New PC
- Summary: How to transfer iTunes library to another computer in Windows 10?
- Conclusion
How to transfer iTunes library to another computer in Windows 10? You may want to move your iTunes library from one computer to another, for example, from an old PC with Windows 7 to a new one with Windows 10.
If you are not that familiar with Apple media, sometimes it can be confusing since the steps are not that intuitive. It will take a few steps more than the traditional 'copy-paste' method for copying the iTunes library from your old PC to the new one.
How to Transfer iTunes Library?
Before transferring, you need to consolidate all the files so that they will be in one location. Note that your iTunes playlist might come from different folders, and there is no need to copy them all into a single folder. Consolidation is the key.
After consolidating, do not forget the importance of the XML file. This file contains the iTunes app's info to locate the songs and copy their details on the dashboard. Assuming you already anticipated your media files' size and prepared the appropriate external drive, here are the complete steps for transferring the files:
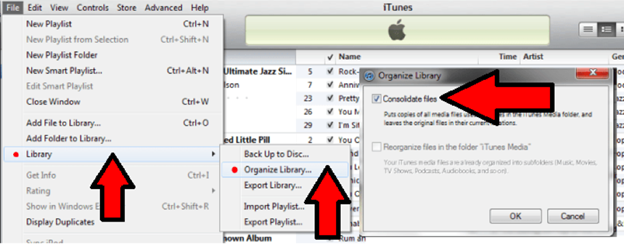
Step 1: Consolidating iTunes Files
- On your previous PC, open iTunes.
- Next, select 'File' then select 'Library'.
- Afterward, choose 'Organize Library' then click on 'Consolidate files.' Click on 'OK.'
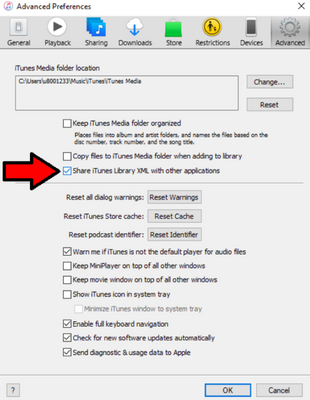
Step 2: Creating An XML File
- If an XML file doesn't exist, you need to create one. From the menu, click on 'Edit' and then select 'Preferences.'
- Select the tab 'Advanced.'
- Mark the box 'Share iTunes Library XML with other applications.'
- Click on 'OK' in order to create the XML file.
Step 3: Copying The Files Onto External Drive
- After consolidating the files, open 'File Explorer' from the Start menu.
- Search for the 'iTunes' media folder usually found in the 'Music' sub-folder of Drive C's Users folder.
- Copy the said folder and paste it on your external drive with the appropriate size.
- After copying the folder, check one more time. After it is okay, disconnect the external drive safely.
- For good measure, try to de-authorize the old computer. Search for help on the iTunes website.
Step 4: Preparing The Environment Of New PC
- Make sure the iTunes app is installed on the new PC. If not, download one online and then install it.
- Before copying the files from the external drive, we need to prepare the environment. First, open iTunes and add any song to the library by clicking on 'File' and 'Add file to Library.' Afterward, close the app.
- Next, open 'File Explorer' and look for the 'Music' sub-folder under 'This PC' folder. Open the 'iTunes' folder.
- If there is no XML file, follow the previous steps in creating an XML file for the iTunes library of the new PC. If the file exists, right-click on it and choose 'Edit.'
- Look for File://localhost/ and highlight the text that starts 'C:/' all the way to 'iTunes/.' Let‘s use this as an example: C:/Users/Bill%20Yovino/Music/iTunes/
- Copy the text, close the Edit window without saving, open the Notepad app, and paste the text.
Step 5: Copying The Files Onto New PC
- On the Music sub-folder, delete the iTunes folder.
- Next, connect the external hard drive to the new PC. Inside the removable drive, copy the 'iTunes' folder that was copied from the previous PC.
- Paste the copied folder on the same Music subfolder from the first procedure. Wait for the whole thing to be copied.
- After you finished copying, move (take note, it is not "copy") the XML file from the copied folder to any folder besides the iTunes folder.
- The next step is to edit the XML file so that the copied files will be recognized in their new location—right-click on the XML file from the copied folder of the external hard-drive. Click on 'Edit.'
- Look for File://localhost/ and highlight the text that starts 'C:/' all the way to 'iTunes/.' Copy the whole text. For this procedure, let us use this as an example:
C:/Documents%20and%20Settings/william.yovino/My%20Documents/My%20Music/iTunes/ - Open another Notepad app, click on 'Edit' and then click on 'Replace'.
- From the 'Find What' field, paste the recently copied text. On the 'Replace With' field, copy the text from the previously highlighted text.
- Click on 'Replace All.' This will change the text:
C:/Documents%20and%20Settings/william.yovino/My%20Documents/My%20Music/iTunes/ into this: C:/Users/Bill%20Yovino/Music/iTunes/ - Save the results and close the Edit window of the XML file. Close all Notepad apps.
- Next, open the iTunes app.
- Select 'File,' then 'Library', and finally 'Import Playlist.' Look for the recently edited XML file, click on it, and click on 'OK.' This will cause iTunes to display the playlist of the songs.
Summary: How to transfer iTunes library to another computer in Windows 10?
- Preparation.
- The solution is to transfer the iTunes library from one computer to another by copying the entire iTunes folder over to an external hard drive.
- An external hard drive is needed for this process, and you will need to have iTunes installed on both your source PC and target PC.
- Do it before computer crashes
- You should do it before you lose any data or before your computer dies completely. Otherwise, you will lose all of your iTunes data in an inevitable disaster.
- Back up your iTunes library.
- Connect an external hard drive to your computer and back up the iTunes library to it as soon as possible so that your important data is on hand and there is no risk of losing them. Use the 'Backup Now' button that you can see once you click on Edit > Preferences > Devices or copy manually all the files from the default iTunes folder to an external hard drive location, which might be faster if you have a road warrior’s appetite for speed. But remember, if you have a lot of content in your library, you may need a high capacity external hard drive for this purpose.
Conclusion
The most likely mistake you will be making is the editing of the XML file. You can just recopy the XML file of the previous PC from your external drive and repeat the steps in editing them.
