SVN is a version control and revision system for managing software development projects. SVN uses an approach such as "every change, can be undone" to make all the information about project's history permanent, it's called Snapshots. I'll try to explain how to use SVN on Windows, so you'll have a brief explanation of SVN and why is this tool very useful.
A Windows SVN, such as TortoiseSVN, is a free shell-extension that you can install freely on your computer. It is an open-source client of Windows for the Apache™ Subversion® version control system that manages the filing and directories.
This allows you to see prior changes done and revised on your device over time. This type of subversion may even be viewed as a “time machine” to project admins.
Steps to follow
To activate your SVN for a new project, you will need to do the following:
- It is already given that the TortoiseSVN has already been installed on your computer. If not, install the TortoiseSVN on your computer before starting with your project. You can download the installer for free on wandisco.com.
Fun fact: You will not have to reboot your device despite the pop-up message the installer is telling you to.
- Create a local directory folder and label it as c:/myproject since the SVN is just a shell extension.
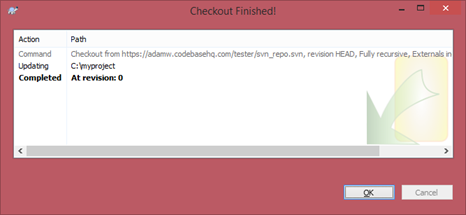
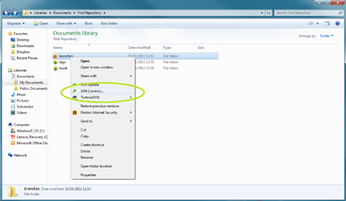
- Next, open the directory and right-click inside the folder of c:/myproject. Scroll down and click on SVN Checkout. It should look like this.

- Once it’s done, this will show up from the checkout dialogue.
- From here, you can then start by setting up the following properties for your client, namely:
a). URL of the repository – this is the URL of the repository you want to check out. This can be done by copy-pasting the URL directly from the repository screen.
b). Checkout directory – this is the default location of your local file system. However, you may be able to change this manually.
c). Check out depth – this is important for reviewing a large repository as it limits the number of checkouts for easy tracing.
d). Revision – as was mentioned before, this is where the “time machine” sort of event is taking place. If you need a specific version where particular changes had been made, then this latest version is made just for you. - The system will get a little bit crowded on your first checkout so it is important to test your SVN first.
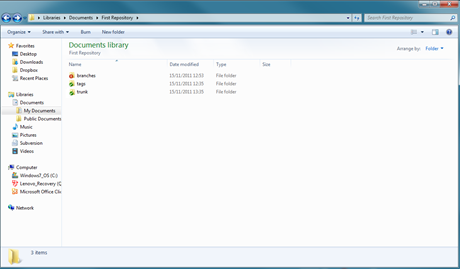
- A folder .svn will get created inside your new project. Once this occurs, click on the root of c:/myproject and clickSVN Commit.
- This is an example of a local version of a project with changes being done. The red exclamation mark is the directory indicating that they had been modified since they were last checked out.
- To get your working projects up-to-date, right-click on your project and click Update from the TortoiseSVN sub-menu.
- A window will pop out showing the changes being made by your team as well as the update’s current progress. Any changes you may have made will also be maintained. Click OK once the revision has been done.
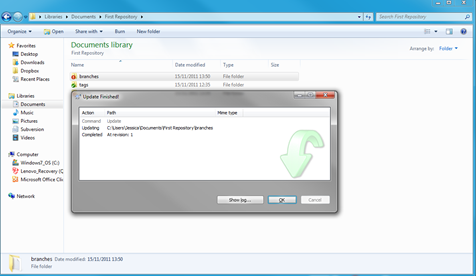 This is an example of changes made:
- Lastly, once your working project has been updated successfully, you can start by adding more directories. To do this, select your desired file and click on SVN Commit.
Reminders
- There are other alternatives to TortoiseSVN like GitHub, BitBucket, TortoiseH,g, and others so try to explore and find the SVN for your device that works for you.
- Setting up a local repository feature is useful for testing and evaluation purposes.
- Features such as icon overlays, context menus, and authentication windows are just as important as the newer update like the “time machine”.
Summary: How to Use SVN on Windows?
- Open TortoiseSVN
- Select Create repository here.
- Select Create directory structure.
- Select Finish.
- Import your project into Subversion Repository.
- Right-click on the project you imported and select Export.
- Specify the destination path of your project on local machine and press OK.
- Check out a copy of your SVN repository. Right-click on the desktop and select SVN Checkout.
- Specify the folder where you want to save the checkout files, create a new folder if needed (like C:\MyCheckout). Press OK.
- Create a working copy from an existing piece of source code by using SVN Checkout or SVN Import directly in web browser or use TortoiseSVN as explained before.
- You will get a local version of your project that is fully functional – you can edit, compile and run it just like any other local project on your computer.
- Now you can use this working copy to transfer changes between repository and working copy, to update your working copy to get updates made by others and to commit changes to the repository when you finish making improvements to the code.
Conclusion
Using SVN is a practical method of tracking real-time changes and revisions on your projects. Not to mention, you can also use it to look for specific versions of a project within a given timeframe. We hope that these tips help you use SVV on your Windows device without any difficulty.
