Google Docs is one of the most popular and commonly used tools among essay writers. This program has a lot of functions, so it is not surprising that it also has borders—bright and colorful frames that can be added to any document. Let us look at how to add borders in Google Docs.
Google Docs is a freeware from Google itself as part of the Google Drive service. It is similar to Microsoft Word, except you can access all the features without spending money. The best part of Google’s office freeware is the wide compatibility of other programs and platforms.
Even though Google Docs has many similarities with Microsoft Word, one thing is surely lacking: borders. Borders are very important for any documentation since they are standards of formality and practicality during the compilation of printed documents. The software may be lacking, but there are ways to create one.
How to Add Borders?
Borders on documents exist to allow space for physical alterations such as punching holes, bookbinding, allowance for finger placement, and more without compromising the printed content. Due to the absence of borders on the document template, you are encouraged to make one through 2 methods.
1). Creating a Table
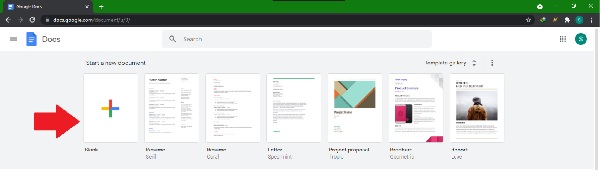
- To start things, you have to create a new document after launching the Google Docs. Select “Blank,” as shown in the figure below.
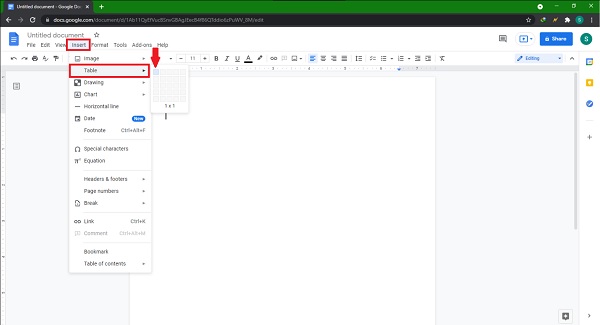
- After creating a new document, you will now create a table consisting of 1 row and 1 column only or a “single-cell” table. To do that, select “Insert” on the menu bar at the top.
- As a drop-down menu will appear, select the option “Table” and choose to make a “1x1 table” or single-cell table.
- Once the table is created, resize it accordingly so that it becomes a border for the document. You can adjust the table’s qualities with the border options located at the window’s upper-right section. The options are “Background Color,” “Border Color,” “Border dash,” and “Border Width.” It is better to utilize these options for accuracy.
- Note that the table-drawing method works only on a single page. To reproduce on other pages, you can utilize the “Copy-Paste” method.

2). Inserting a Drawing
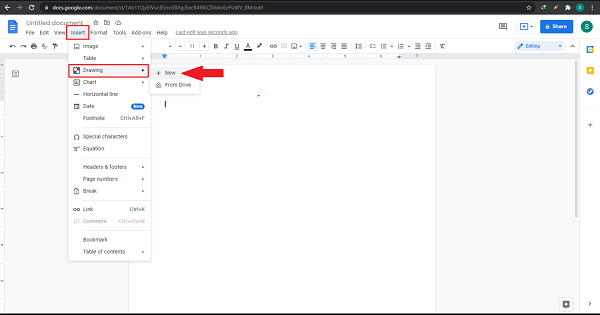
- Aside from making a table, you can draw a rectangular shape that can act as a border. Assuming you already have a new blank document, select “Insert” on the menu bar and choose “Drawing…” when a drop-down menu appears. Afterward, select “New.”
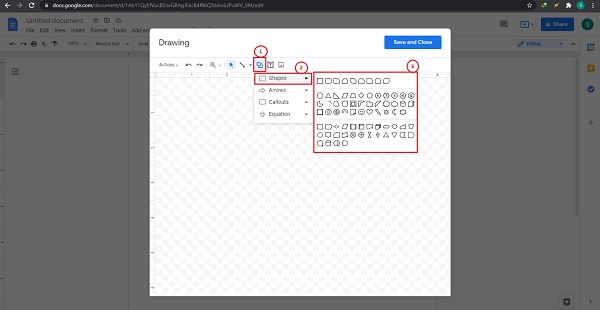
- The drawing toolbox will appear on the document’s window. Click on “Shape” (Refer to Red #1 on the image below) and select “Shapes” (Refer to Red #2). Various choices of shapes are provided (Refer to Red #3) wherein you can have the freedom to make a border that can not be a rectangle.
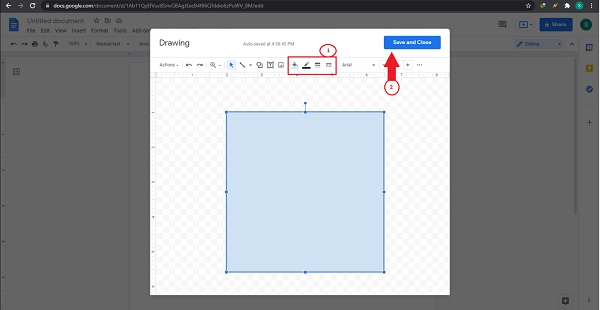
- After the shape is drawn, the border menu will appear, similar to that after drawing a single-cell table. The border menu contains the same options, and it is best to use for that necessary accuracy. Once you are contented, click on “Save and Close.”
- If you want to make adjustments, hover your mouse pointer on the document’s border, and a menu will be displayed. Click on the option “Edit.”
Summary: Add border in Google Docs
- Open a Google Doc.
- Select the part of the text that you want to add a border to.
- Click on 'Format' at the top of the page.
- Click on 'Border'.
- A drop-down menu will appear with options to add borders to the selected text or remove any existing borders.
- You can also change the border color and type.
Conclusion
To reuse the document with the border, you can save it as your template. You can save time by not making a border again. Please note that the techniques suggested only work for a 1-page document, and you need to “Copy-Paste” it for the rest of the pages.
