Operating systems and applications may also have an automatic back up as one of their features. Windows operating system has the Backup feature, which conveniently allows users to back up data and system regularly, and to avoid system corruption and data loss in the computer. Needless to say, automatic backups are useful in safeguarding the data.

However, these data can pile up without notice and these would take up a huge amount of space in the backup disk. Once the backup disk is full, no backups will be created, which would leave the data and the system vulnerable.
From time to time, it is necessary to delete old back up or remove app back up files to make room on the drive to keep on creating backups. This way, the system is ensured to run smoothly.
So how is deleting backup files done on Windows 10?
In the strive to make Windows 10 more user-friendly, Microsoft has made the process of changing the system settings more straightforward.
Follow these simple steps to delete Windows 10 backup files.
- Click on the search field next to the “Start” button and type Control Panel.
- Click on the result: Control Panel app.
- Find the System and Security heading and click on it. Do NOT click any of the links below it.
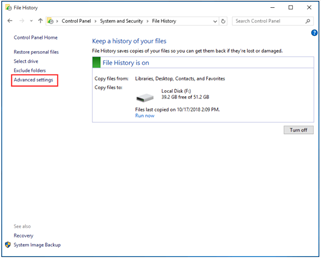
- Click on the File History icon.
- On the left side, find the Advanced settings link.
- Under the Advanced settings link, click on the Clean up versions link.
- From the drop-down list, select the time period of versions to be deleted. One option is All but the latest one as seen in this example. When this is selected, all will be deleted except for the current version and one previous version of the files and folders. This should provide ample space.
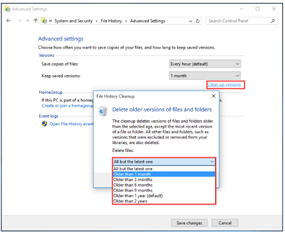
- Click on Clean up once a decision has been made on what to delete.
And that’s it! Done.
Further Reading: Deleting System Restore Points
With Windows 10, it is also possible to create restore points to help backup and restore the system without having to reinstall the operating system.
This is useful, especially when the system crashes repeatedly. But just like automatic file backups, system restore points also take up a lot of space over time. Thankfully, it easy to delete older restore points to free up disk space.
Here are the steps to delete Windows 10 system restore points.
- Click on the search field next to the Start button and type Create a restore point.
- Click the result Create a restore point.
- Under the System Protection tab, click on the drive where the Protection is turned On.
- Click on Configure… button.
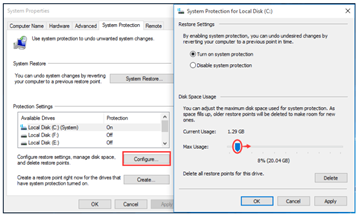
- Next to the text “Delete all restore point for this drive”, a Delete button will be found. You may also modify the maximum disk space used for system protection using the toggle next to the text “Max Usage”. The minimum is 1%. Once the set storage is filled up, the older restore points will be deleted and automatically replaced by the new ones.
- Click on the OK button to finish once a decision has been made.
Done!
Microsoft has made it more manageable for even the not so tech-savvy consumers to set up their devices to accommodate their needs. Even so, sometimes a good guide is needed to thoroughly understand the process. With that said, the steps in this article are easy to follow and are helpful to those who need guidance on freeing up disk space on their computer.
Summary: Delete backup files in Windows 10
- Open Settings.
- Click on System.
- Click on Storage.
- Under Storage sense, click the Change how we free up space automatically link.
- Quick tip: If Storage sense is turned off, you can enable it under the Free up space now section.
- Turn on the Delete temporary files that my apps aren't using option.
- Check the Previous version of Windows option under Free up space by deleting previous versions of Windows section.
- Confirm your action by clicking the Clean now button, and then select Delete files under Temporary files to remove all temporary files from your device.
